最近跑的專案都是四個人以上同時開發,有時候程式碼被改了,Pull下來改完衝突,發現程式碼都會錯亂。排除每個人對Git熟練度,我覺得Gitlab對於Review code做的似乎不是很友善。Scrum在跑的時候碰到這類型的問題,每次要解決都要花不少時間。
在某一次尋找Git相關教學的時候發現了一個蠻冷門的東西Phabricator,當初看到這套的時候第一印象就覺得這也是版本控制,所以加入最愛後就沒再理他,當碰到最近的問題,才想到我似乎在哪裡有看到這種問題的Solution。
這一套Phabricator是Facebook釋出的Open source,Facebook也是為了解決Review Code, Track Bugs, Browse Source…等等這些問題才會開發這一套系統。
開始安裝
在官網是很詳細的安裝方式我在這邊粗略的介紹一下。
要使用Phabricator一定得先安裝git, apache, mysql, php, php extensions (mbstring, iconv…等)
- git (usually called “git” in package management systems)
- Apache (usually “httpd” or “apache2”) (or nginx)
- MySQL Server (usually “mysqld” or “mysql-server”)
- PHP (usually “php”)
- Required PHP extensions: mbstring, iconv, mysql (or mysqli), curl, pcntl (these might be something like “php-mysql” or “php5-mysql”)
- Optional PHP extensions: gd, apc (special instructions for APC are available below if you have difficulty installing it), xhprof (instructions below, you only need this if you are developing Phabricator)
他還有些版本的限制,必需要注意。安裝以上是比較基本的,接下來就是clone。
$ cd somewhere/ # pick some install directory
somewhere/ $ git clone git://github.com/facebook/libphutil.git
somewhere/ $ git clone git://github.com/facebook/arcanist.git
somewhere/ $ git clone git://github.com/facebook/phabricator.git
clone下來最好就在libphutil、arcanist、phabricator先執行git pull因為我沒有這樣做,多花了一個小時找問題阿…結果根本就不是最新的版本。
另外可以選擇是不是要安裝APC、XHProf
修改httpd-vhosts.conf
我的東西大部份都是部屬在Apache上這個也不例外。所以我加上sub domain相關的參數。
$ vim /etc/httpd/conf.d/httpd-vhosts.conf
<virtualhost>
        # Change this to the domain which points to your host.
        ServerName phabricator.example.com.tw
        # Change this to the path where you put 'phabricator' when you checked it
        # out from GitHub when following the Installation Guide.
        #
        # Make sure you include "/webroot" at the end!
        DocumentRoot /path/to/phabricator/webroot

        RewriteEngine on
        RewriteRule ^/rsrc/(.*)     -                       [L,QSA]
        RewriteRule ^/favicon.ico   -                       [L,QSA]
        RewriteRule ^(.*)$          /index.php?__path__=$1  [B,L,QSA]
        <directory>
                Order allow,deny
                Allow from all
        </directory></virtualhost>
設定完domain訪問設定的網址,依照指示要先設定Mysql。
設定Mysql
$ cd /somewhere/phabricator/
$ ./bin/config set mysql.host mysql主機
Set 'mysql.host' in local configuration.
$ ./bin/config set mysql.user mysql帳號
Set 'mysql.user' in local configuration.
$ ./bin/config set mysql.pass mysql密碼
Set 'mysql.pass' in local configuration.
Phabricator upgrade
更新到最新的版本會有下列訊息。
$ ./bin/storage upgrade
Before running storage upgrades, you should take down the Phabricator web
interface and stop any running Phabricator daemons (you can disable this
warning with --force).

    Are you ready to continue? [y/N] y

Loading quickstart template...
Applying patch 'phabricator:db.conpherence'...
Applying patch 'phabricator:db.token'...
Applying patch 'phabricator:db.releeph'...
Applying patch 'phabricator:db.phlux'...
Applying patch 'phabricator:db.phortune'...
Applying patch 'phabricator:db.phrequent'...
Applying patch 'phabricator:db.diviner'...
...
...
Done.
Storage is up to date. Use 'storage status' for details.
更新完畢後再回去網頁,會看到登入畫面。

設定Admin帳號
$ ./bin/accountadmin
Enter a username to create a new account or edit an existing account.

    Enter a username: admin
There is no existing user account 'admin'.


    Do you want to create a new 'admin' account? [Y/n] Y


    Enter user real name: admin


    Enter user email address: xxx@xxxx


    Enter a password for this user [blank to leave unchanged]:

    Should this user be a system agent? [y/N] y


    Should this user be an administrator? [y/N] y


ACCOUNT SUMMARY

               OLD VALUE                        NEW VALUE
    Username                                    admin
   Real Name                                    admin
       Email                                    xxx@xxxx
    Password                                    Updated
System Agent   N                                Y
       Admin   N                                Y


    Save these changes? [Y/n] y

Saved changes.
最後就是需要開啟背景執行。
$ ./bin/config set phabricator.base-uri 'http://phabricator.example.com.tw/'
Set 'phabricator.base-uri' in local configuration.
$ ./bin/phd start
Staging launch...
NOTE: Logs will appear in '/var/tmp/phd/log/daemons.log'.

Launching 'PhabricatorRepositoryPullLocalDaemon'...
Launching 'PhabricatorGarbageCollectorDaemon'...
Launching 'PhabricatorTaskmasterDaemon'...
Launching 'PhabricatorTaskmasterDaemon'...
Launching 'PhabricatorTaskmasterDaemon'...
Launching 'PhabricatorTaskmasterDaemon'...
Done.
這樣就完成了,我覺得他的安裝非常簡單。安裝下來我也沒遇到什麼大問題。
與Gitlab串接
登入後在左邊的選單依序點選
ADMINISTRATION > Repositories > Create New Repository
表單中填入
Name: yout project name
Callsign: VCS
Type: Git
Callsign為什麼是VCS因為這邊有相關的設定可以參考。
It is followed by the repository callsign, and then a VCS-specific commit identifier (for SVN, the commit number; for Git and Mercurial, the commit hash)。
下一步後依序設定:
Basics
Tracking: Enabled
Remote URI
Repository URI: your repository url
Repository Information
Local Path: your project path
Track Only: your want track branches
設定完就可以看到

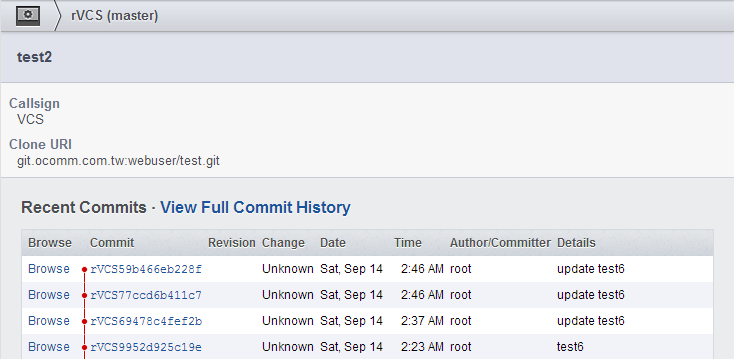
點選View in Diffusion可以看到這個repository的各種記錄

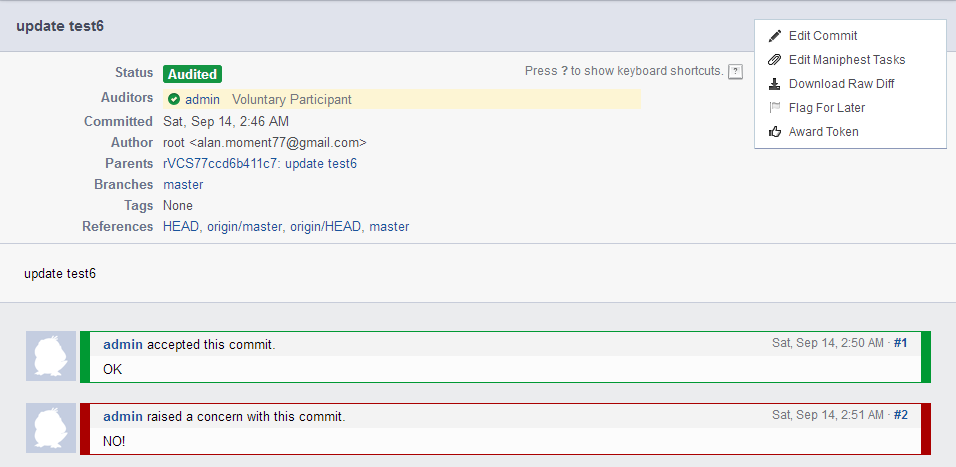
若在某一次的記錄review code發現有問題都可以在diffusion > Raise Concern,回報都會有紀錄存在直到消除Raise Concern。
