Review code 前置設定
在 Config > Diffusion 設定
diffusion.ssh-port  "your ssh port"
diffusion.ssh-user  "your username"
或是 command line 執行
$ cd /path/to/phabricator
$ ./bin/config set diffusion.ssh-user "your username"
在 Config > Daemon > sphd.user 設定
phd.user "your username"
或是 command line 執行
$ ./bin/config set phd.user "your username"
要注意的就是 Config > Conduit > conduit.servers 是否有設定,我是預設留空的。
Create Repository
因為有新版的 Repository 設定,所以舊版的已經不適用,新版的設定中有更清楚的設置流程了。
按下 Create Repository 開始建立需要 Review 的版本庫。
- Repository Type 選擇使用的版本控制系統。
- Repository Name and Location 輸入人類看的懂的標題,以及版本控制
Callsign,官網的範例是取專案第一個字母,必須要為大寫。譬如專案名字是Test那Callsign就是T。 - Policies 選擇可以控制這個版本庫的群組、會員。
- Repository Ready! 開始建立新的版本庫,或是略過直接到設定檔設定。
我都是到第四步之後直接選
Configure More Options First。
這邊有兩種方式,可以提供 review 的服務,一是用 Phabricator 自帶的 Host Repository on Phabricator,可以參考官網設定,這個服務是方便自動 merge,push。但是當我完成官網上的設定後,提交 review code 的請求在驗證 ssh 會出問題,導致一直無法自動 push,無法收到需要 review 的請求,所以後來放棄,改用 Host Repository Elsewhere。
當 Host Repository Elsewhere 的設定都完成了,接著設定 Remote ,Remote URI 選擇版本庫位置,當然也可以用 Github 上的,Credential 則是看使用的是哪一種方式,若是用 git@ 那就必須要增加 private key,若是用 http 那就必須要增加 password 的驗證方式。
Local 則是放置 repo 的地方,Branches 選擇預設 track 的分支、或是只 track 哪一個分支,最後是 Autoclose Only,這個設定要相當小心,因為當提交 Review 通過後,會自動關閉分支。可在 Actions 中關閉。
這些設定都完成後就可以啟動 Daemons, 因為這很常使用所以我寫了一隻 shell script
放在 .bashrc
$ vim ~/.bashrc
# Phabricator service
function phb(){
        if [ "$1" == "home" ]; then
                cd /path/to/phabricator/
        elif [ "$1" == "start" ]; then
                /path/to/phabricator/bin/phd start
        elif [ "$1" == "stop" ]; then
                /path/to/phabricator/bin/phd stop
        elif [ "$1" == "restart" ]; then
                /path/to/phabricator/bin/phd restart
        elif [ "$1" == "edit" ]; then
                rm -rf /path/to/phabricator/local/$2
                /path/to/phabricator/bin/repository edit $2 --as webuser --local-path $3
        elif [ "$1" == "delete" ]; then
                rm -rf /path/to/phabricator/local/$2
                /path/to/phabricator/bin/repository delete $2
        fi
}
這樣就可以用 phb start 啟動了。
設置 Arcanist
在官網的設置教學很簡單易懂,安裝完也必須設定變數:
在 Linux 上需要設定 EDITOR 及 arcanist 的路徑環境變數。
$ vim ~/.bashrc
export PATH="$PATH:/path/to/phabricator/arcanist/bin/"
export EDITOR=$(which vim)
在 Windows 上需要設定 core.editor 及 arcanist 的路徑環境變數。
打開 cmd.exe 輸入
git config --global core.editor "C:\Windows\notepad.exe" fileeditor
就會在 .gitconfig 產生
editor = C:\\Windows\\notepad.exe fileeditor
接下來就可以開始提交 review 請求
提交程式碼
在這邊記錄以 Linux 的方式提交,試著執行 arc
$ arc
Usage Exception: No command provided. Try 'arc help'.
若出現這個錯誤訊息,表示 arc 已經設定成功。
檢查當前檔案狀態
$ git commit -a
# On branch master
# Untracked files:
#   (use "git add <file>..." to include in what will be committed)
#
#       alan_test.txt
nothing added to commit but untracked files present (use "git add" to track)
把 alan_test.txt 提交 review,從原本的 git add 改執行 arc diff
$ arc diff
Usage Exception: YOU NEED TO INSTALL A CERTIFICATE TO LOGIN TO PHABRICATOR

You are trying to connect to 'http://phabricator.example.tw/api/' but do not have a certificate installed for this host. Run:

      $ arc install-certificate

...to install one.
會發生錯誤是因為尚未設定 certificate 系統通知該做什麼設定。
$ arc install-certificate
Installing certificate for 'http://phabricator.example.tw/api/'...
Trying to connect to server...
Connection OK!

LOGIN TO PHABRICATOR
Open this page in your browser and login to Phabricator if necessary:

    http://phabricator.example.tw/conduit/token/

Then paste the token on that page below.

    Paste token from that page:
打開瀏覽器訪問 http://phabricator.example.tw/conduit/token/,並且登入要連結 Phabricator 上的 user。
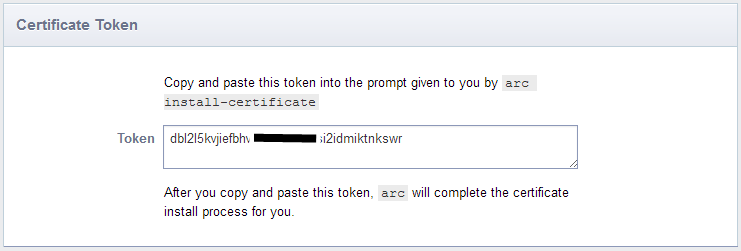
取得 Token,並且輸入上一步驟的設定。
Installing certificate for 'http://phabricator.example.tw/api/'...
Trying to connect to server...
Connection OK!

LOGIN TO PHABRICATOR
Open this page in your browser and login to Phabricator if necessary:

    http://phabricator.example.tw/conduit/token/

Then paste the token on that page below.

    Paste token from that page: dbl2l5kvjiefbhv2ex--------jsi2idmiktnkswr

Downloading authentication certificate...
Installing certificate for 'alan'...
Writing ~/.arcrc...
 SUCCESS!  Certificate installed.
設定成功,打開 .arcrc 就會發現設定是 Phabricator 的 user。
再次執行提交
$ arc diff
You have untracked files in this working copy.

  Working copy: /home/alan/test/

  Untracked files in working copy:
    alan_test.txt

Since you don't have '.gitignore' rules for these files and have not listed
them in '.git/info/exclude', you may have forgotten to 'git add' them to your
commit.


Do you want to add this file to the commit? [y/N] y


Enter commit message: alan arc test
接下來會跳轉到輸入詳細的資訊
alan arc test

Summary: my first test

Test Plan: none

Reviewers: webuser

CC:

# Tip: Use "Fixes T123" in your summary to mark that the current revision
# completes a given task.

# NEW DIFFERENTIAL REVISION
# Describe the changes in this new revision.
#
# Included commits in branch master:
#
#         5780b5046d43 alan arc test
#
# arc could not identify any existing revision in your working copy.
# If you intended to update an existing revision, use:
#
#   $ arc diff --update <revision>
:wq 儲存後離開會開始提交
Linting...
No lint engine configured for this project.
Running unit tests...
No unit test engine is configured for this project.
Updating commit message...
Created a new Differential revision:
        Revision URI: http://phabricator.example.tw/D21

Included changes:
  A       alan_test.txt
這邊個資訊是在告知提交的資訊中沒有交代要 test,及 review 版號是 D21 包含改變的檔案清單,這樣就完成了 client 的提交。因為在 Reviewers: 填寫的是 webuser,所以他會收到通知。
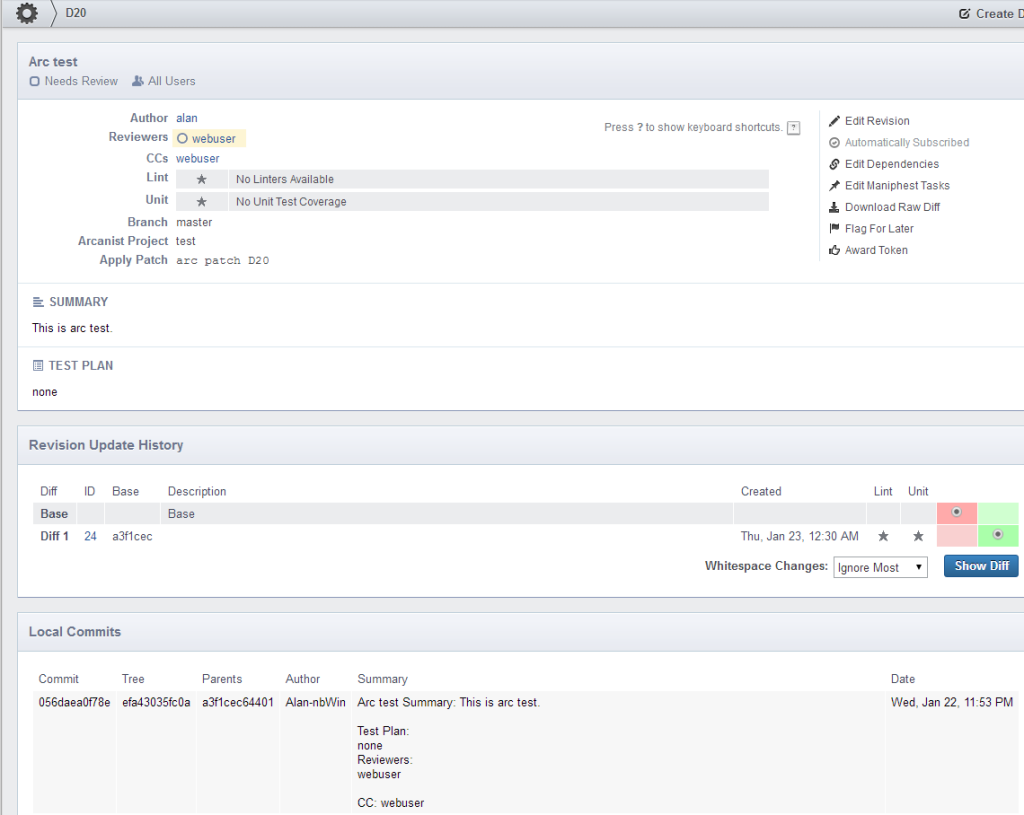
接下來就可以看到詳細的資料,alan 改變了檔案提交了程式碼,webuser 需要透過介面完成審核。
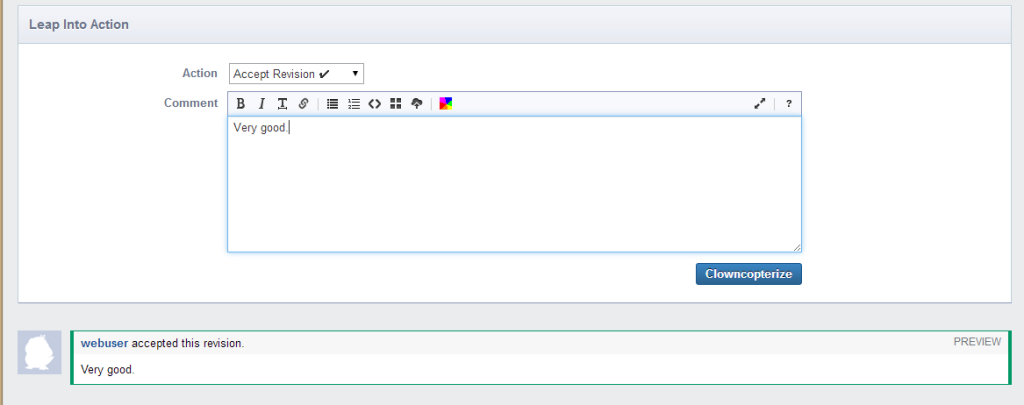
當 webuser 完成了審核,同意了。alan 也會收到通過的通知。

alan 也可以看到詳細的資訊。
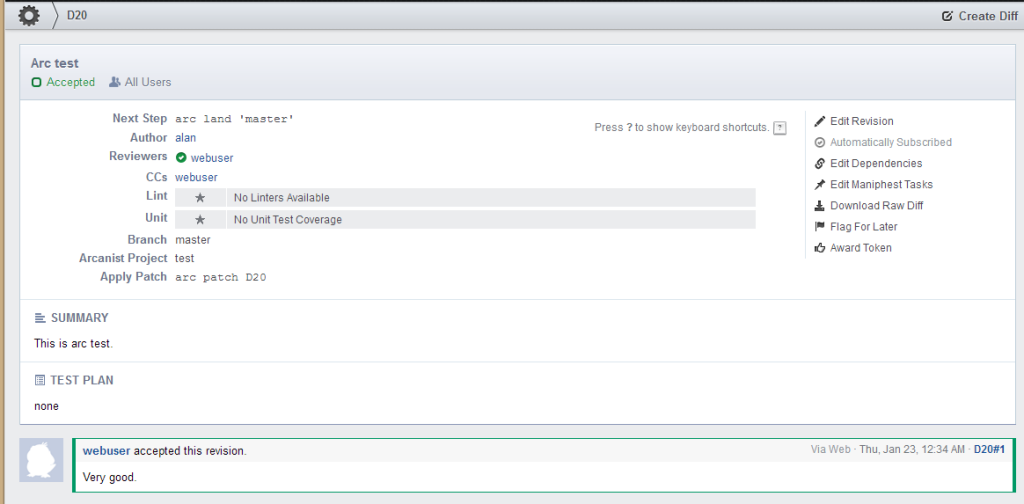
這時候就可以把改變的檔案 push 上版本庫,若是按正常流程要 git add, git commit,但是在這邊只需要執行
$ arc amend
或是
$ arc land 'branch name' D版號
amend 是提交全部已經通過審核的版本,而 land 則可以單獨指定,
$ arc amend
Amending commit message to reflect revision D21: alan arc test.
Closing revision D21 'alan arc test'...
You may now push this commit upstream, as appropriate (e.g. with 'git push',
or 'git svn dcommit', or by printing and faxing it).
系統通知完成 D21 的提交,並且要自己執行 git push。
$ git push
Counting objects: 4, done.
Compressing objects: 100% (2/2), done.
Writing objects: 100% (3/3), 373 bytes, done.
Total 3 (delta 1), reused 0 (delta 0)
To git@git.ocomm.com.tw:home/test.git
   1d4af3f..d885ebb  master -> master
若是沒在網站介面審核通過就直接執行 arc diff 會有提示訊息出縣,要求先通過審核。
$ arc diff
Amending commit message to reflect revision.
Done.
這樣就完成囉!! 回到網站介面可以發現,版本庫中已經完成一次提交。
